-1.png?width=557&height=93&name=Phonovation%20Logo%20(1)-1.png)
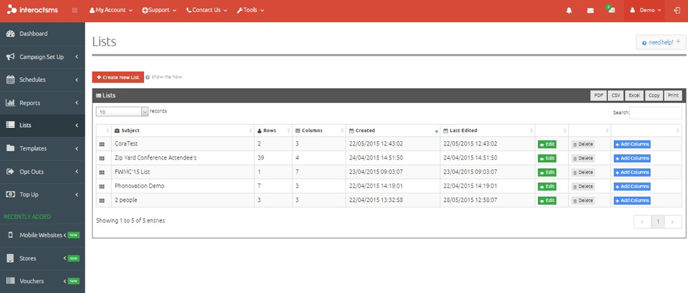
List Types
There are four different list types, each denoted by a different symbol on the left of the Subject line:
 Basic list: Lists that contain only one column of information. This information must be mobile numbers.
 Advanced list: Lists with two or more columns of information. The first column will contain mobile numbers but there can be as many additional columns as you like containing all the customer information from your CRM.
 Merged list: Advanced lists that have had additional information added to them after creation. For more information on this, please see the section on Add/Remove Information from Advanced Lists.
 Master list: Lists that are automatically updated with information from your CRM. To discuss setting up a master list, please contact your account manager.
Create a List
To create a list, select Create new list and the below popup window will be displayed. Lists can be imported from either Microsoft Excel© (.xlsx).
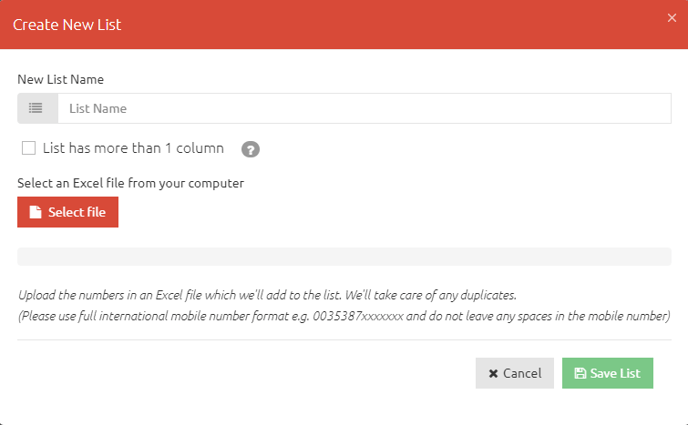
New List Name
This will be the name that the list will be saved as.
Check if Your List Has More Than One Column
If you have a simple list containing only mobile numbers (Column A) then do not check this box.
Import Column Names from First Row
This option will only be displayed if you have selected to create a list with more than one column. Check this box if you have used the first row of your list to name each column. If you have not named the columns in the first row, names can be added after the upload. Please see section Edit Lists.
Select an Excel© File or Text File from Your Computer
First, you will be required to choose the file that you want to upload. The application allows you to upload both Microsoft Excel© files (.xls and .xlsx) and Plain Text files (.txt). The files need to be formatted in the correct format, prior to being uploaded.
Microsoft Excel© file format (.xls and .xlsx):
This feature requires Microsoft Excel© to be installed on your computer.
-
Mobile Numbers – Column A:
The first column (column A) of the Excel© file must contain the mobile numbers of your contacts. Basic lists will contain only mobile numbers.

Mobile numbers in Microsoft Excel© files must be formatted as follows prior to being uploaded:
- The contact numbers should be placed in the first column (Column A) of your Microsoft Excel© file.
- The number should be formatted with the full international code, e.g. 00353861111111 or 353861111111.
- You may need to format the first column (Column A) of the Microsoft Excel© document. Please see sections on Formatting the Number Column (Column A) in Campaign Set up.
- Make sure that there are no breaks or empty records (rows) in the file.
- There should be no formulas in the Microsoft Excel© cells.
-
Additional columns:
Columns after column A (column B, C, etc.) may contain any additional information relating to your contacts.
For example, if you know the first names of your contacts, you can enter the names into column B (or any other column apart from column A) with each name in the relevant row for that contact’s mobile number. If you know your contact's date of birth, you can enter that into column C (or any other column apart from column A). Your file can contain as many columns as you want.

Column Names – Row 1:
Naming columns helps you to identify and sort information when using Smart tags and Filters.
In order to name a file’s columns, the column names must be contained in row 1.
If your list contains names in its first row, then you must check the Import names from first row box, when creating the list. If you have not named the columns in the first row, names can be added after the upload. Please see section Edit Lists.

Upload file:
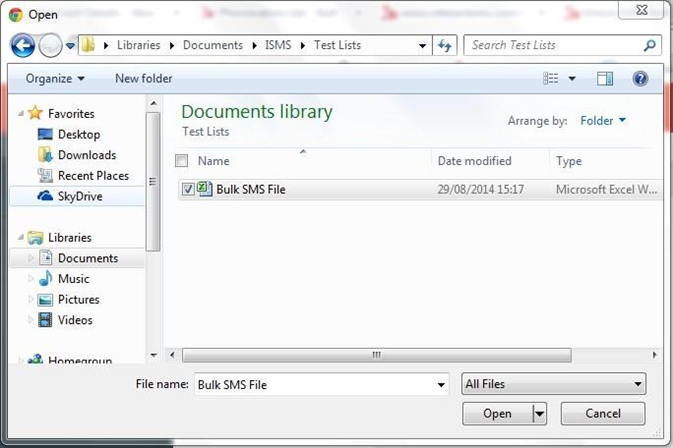
Once you have formatted the file correctly, you can then browse to where your file is located by selecting the Select file button. The File upload window is displayed. Navigate to the correct file path location and select Open. This demonstration is using the Microsoft Windows operating system; the file selection method will vary for different operating systems.
To save the uploaded file as an imported list, select the Save list button.

Edit Lists
Once you have saved a new list, the above popup will be displayed. Here you can inspect how many rows and columns are contained in the list, as well as the date the list was created on and last modified on. You can also edit the list's data from this popup.
The Delete this list button gives you the option to delete the list from your saved lists.
The Export this list button gives you the option to export the list to a Microsoft Excel© file.

Select Edit columns and the below will be displayed. Here you can view information about the columns and edit their names. These names are used for reference when creating filters or smart tags.
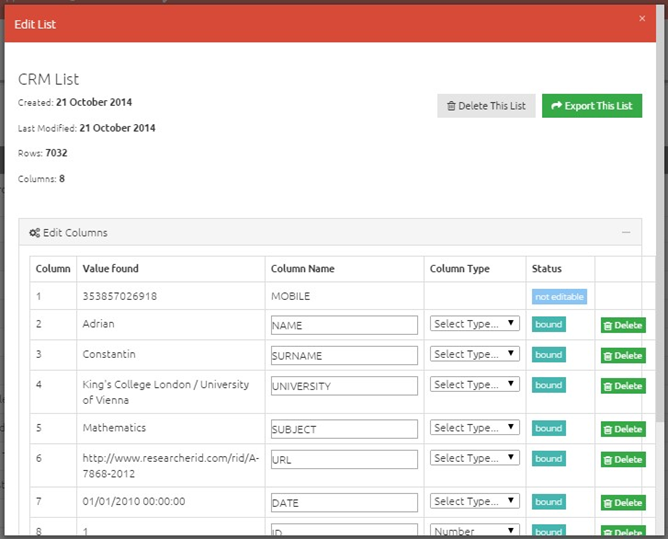
The Edit List table contains the following information: Column, Value found, Column name, Column type, and Status.
- Column: The number of each column, where it is located in the list.
- Value found: The value in each column for the first contact in the list. If the first row contains the column names, then these values will be taken from the second column.
- Column name: The names of each column. If you have selected to import names from the first row when uploading the list, then these will already be populated with the values from the first row. The values can be edited from here. These fields will be blank if you have not selected to import names from the first row when uploading the list. Column names can be added to your list here, even if they are not contained in the uploaded file.
- Column type: The value type contained in this column. Value types can be Text, Mobile (Number), Number, or Date.
- Status: The status of a column name can be: not editable, not specified, or bound.
The MOBILE column is the only one that is not editable and cannot be changed from this status.
If a column has not been assigned a name, then its status is not specified. A name can be assigned by entering it into the text box and clicking the Save button on the right-hand side of that column’s status.
If a column has been assigned a name, then its status is bound. A column name can be bound by the method in the previous paragraph. Alternatively, if you have selected to import names from the first row when uploading the list, the values from the first row will automatically be bound. These can be edited by entering a new name into the text field and clicking the Save button on the right-hand side of that column’s status.
Once the list’s columns are named, click the Save list button to exit the popup.
Add/Remove Numbers from Basic Lists
Contacts can be added to or removed from lists after they are saved. Numbers can be added/removed either by uploading a file of numbers or by entering numbers one by one. Only mobile numbers can be added or removed from a list with only one column.
![]()
Add Numbers to a Basic List:
To add numbers to a list with one column, you will be required to carry out the following:
- Select the list you want to edit from the list section and click the Edit button on the right-hand side of that list’s entry.
- Select a Microsoft Excel© file or Text file to upload; the list of numbers can be added to the existing list of numbers by browsing for the correct file and selecting the Add button.
- Alternatively, a single number can be added one at a time by entering the number in the Or add one number text field and selecting Add number.

Remove Numbers from a Basic List:
To remove numbers from a list, you will be required to carry out the following:
- Select the list you want to edit from the list section and click the Edit button on the right-hand side of that list’s entry.
- Select a Microsoft Excel© file or Text file to upload. The list of numbers can be removed from the existing list of numbers by browsing for the correct file and selecting the Remove button.
- Alternatively, a single number can be removed, one at a time, by entering the number in the Or remove one number text box and selecting Remove number.
Add Information from Advanced Lists
Advanced lists can be updated to include additional contacts and/or additional information about existing contacts. This is done by uploading the additional information in a Microsoft Excel© spreadsheet.
To the right of the advanced list that you want to edit, select the Add column button.

The below popup will be displayed.
Primary list:
This is the name of the list that you have selected to add columns to. Below this you have two options of which you must check one.
-
Create a new list with the added information:
This will create a brand new merged list that will contain the information from your primary list and the information you have uploaded. Once this option is selected, enter a name for the new merged list in the New list name field.
-
Append columns to the existing list:
This will edit your primary list by adding the information from your Excel© spreadsheet. Once you append the columns to a list, the list will be overwritten and cannot be undone.
Select an Excel© file from your computer:
Next, select an Excel© file from your computer that you have already saved with the information that you would like to update your list with. To see how to format an Excel© spreadsheet, please see the section on Select an Excel© file (or Text file) from your computer, in the Lists section.
Select the Ignore the first row if it contains the names of the columns if your Excel© spreadsheet contains the names of each column in the first row. If it doesn’t, these can be added later.
Once the file is selected, click the Upload button. The below popup screen will then appear.
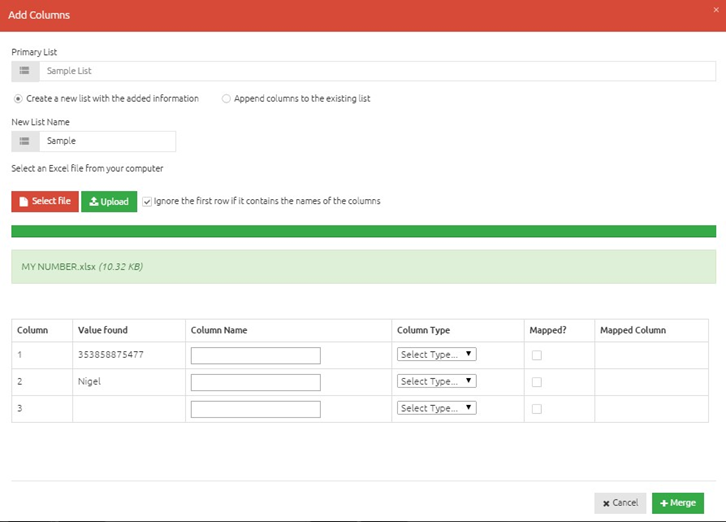
Column name:
Enter the name you would like for each column.
Column type:
Select whether the columns' values are Text, Mobile, Number, or Date.
Mapped?:
If you check a box to map a column, the new information will be added onto that column as additional rows. Columns that are not mapped are added to the list as new columns. At least one of the uploaded file columns must be mapped onto a column from the original list.
Mapped column:
If you have selected to map a column, a dropdown menu will be displayed here. It contains the existing columns, one of which you must select to be the column that the new information is mapped to.
Complete the merge:
If you are happy to merge the information into an existing advanced list or to create a new merged list, click the Merge button. To cancel the process, select the Cancel button and the list will remain unchanged.
Delete or Export Lists
The Delete this list button gives you the option to delete the list from your saved lists at this stage. The Export this list button gives you the option to export the list to a Microsoft Excel© file.

EXPORT LISTS
Lists can be exported to Microsoft Excel© files.
Select the list you want to export from the list section and click the Edit button on the right-hand side of that list’s entry. Select Export This List on the top right of the popup.
DELETE LISTS
To delete a list, select Delete on the far right-hand side of the list that you want to delete from the Lists page.
The list will now be permanently deleted.