-1.png?width=557&height=93&name=Phonovation%20Logo%20(1)-1.png)
Steps to Send a Campaign
- Step 1: Who do you want to send to?
- Step 2: Who do you want to send it from?
- Step 3: What would you like to say?
- Step 4: When would you like to send it?
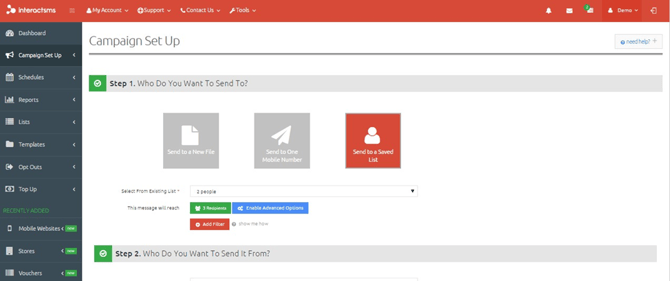
Step 1: Who do you want to send to?
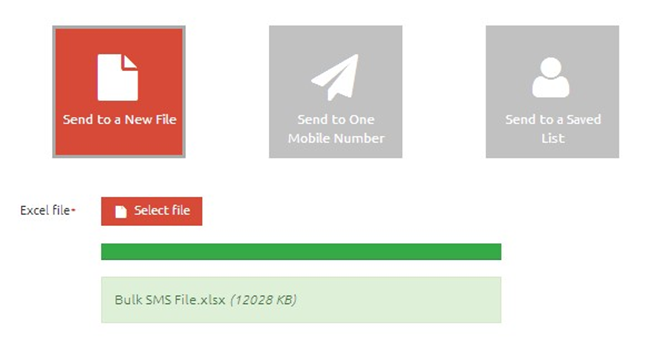
Send to a New File
Select Excel© File:
- The application allows you to upload Microsoft Excel© files only (.xls or .xlsx). These files must be formatted correctly before being uploaded.
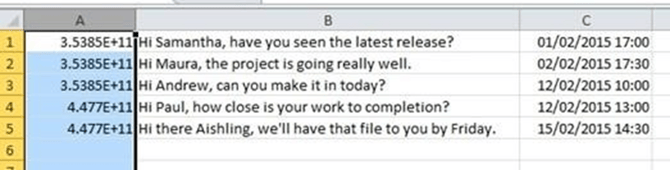
- Formatting Requirements for Mobile Numbers (Column A):
- Place contact numbers in the first column (Column A).
- Format the numbers with the full international code (e.g., 00353850000001 or 353850000001).
- Remove special characters and spaces.
- Ensure no breaks or empty records (rows) are in the file.
- Avoid formulas in the cells.

Upload and Display:
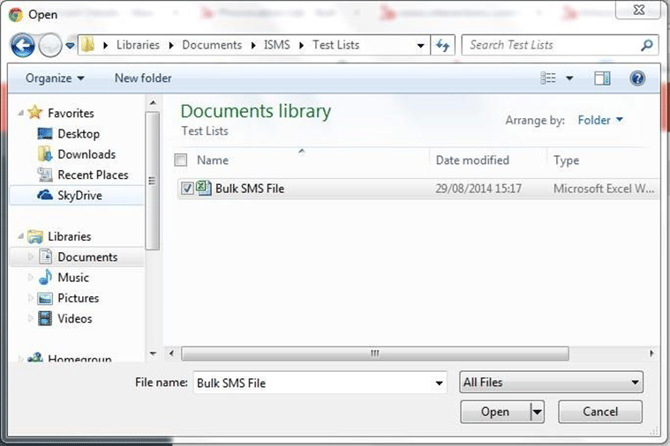
- Browse to the file location and select it.
- If the file is a Microsoft Excel© file, the list will be uploaded and displayed.
Advanced Files:
- May contain message text in the second column and/or scheduled dates and times in the third column.
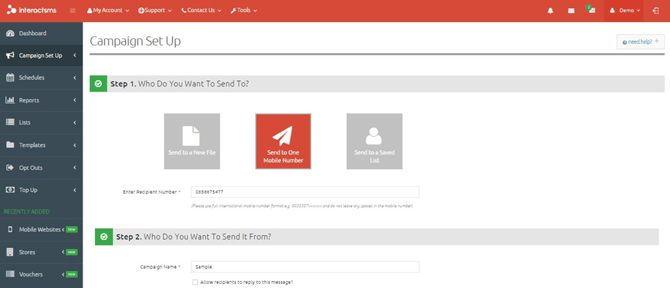
Send to One Mobile Number
Enter Recipient Number:
- Format the number with the full international code (e.g., 00353850000001 or 353850000001).
- Ensure no special characters and spaces are included.
Send to a Saved List
Select from Saved Lists:
- Choose a saved list of contacts to whom you want to send the SMS campaign.
- This option is useful for sending to predefined groups of contacts.
Step 2: Who do you want to send it from?
Campaign Name:
- Enter a name for the message campaign. This is for your reference only and will not be sent as part of the message.
- Example: ‘May Discount Campaign’.
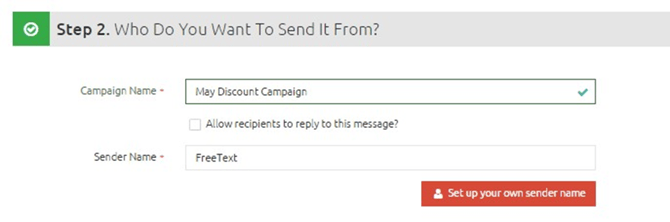
Allow Recipients to Reply:
- Enable the feature that allows recipients to respond to SMS messages by requesting a longcode (mobile number) to be added to your account. For more information, contact sales@phonovation.com.
- Replies can be viewed in the Replies report.

Sender Name:
- Enter the name that will appear at the top of the recipient’s handset. The default sender name is set to FreeText.
- A new sender name can be created upon request.
- Example: ‘InteractSMS’.

-
- Select "Set up your own sender name" and enter the required details.
- Sender names must be manually screened by Phonovation before use.
- Requirements: Must not exceed 11 characters, contain only alphanumeric characters, no spaces, and must not conflict with existing sender names.
Set Up Your Own Sender Name:
Step 3: What would you like to say?
Choose from Templates:
- Select a saved template to populate the message text box. Templates can be edited before sending.
- Templates are useful for predefined messages.

Message Text:
- Enter the body of the message that will be sent.

Message Length and Special Characters:
- A standard SMS message length is 160 characters. Longer messages will use multiple credits.
- Special characters may use more than one character space.
Save Message Text as a Template:
- Option to save the message as a template for future use.
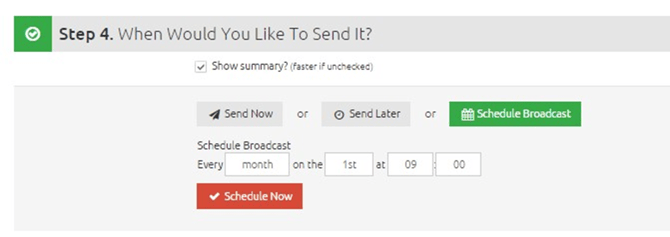
Step 4: When would you like to send it?
Send Now:
- Select this option to send the message immediately.

Send Later:
- Select this option to schedule the message for a future date and time.
- You can enter the desired date and time for the message to be sent.

Schedule Broadcast (For Saved Lists Only):
- Campaigns sent from a saved list can be scheduled to automatically send at selected times, to be repeated indefinitely.
- Select "Schedule Broadcast" and choose the desired frequency and times for the broadcasts.
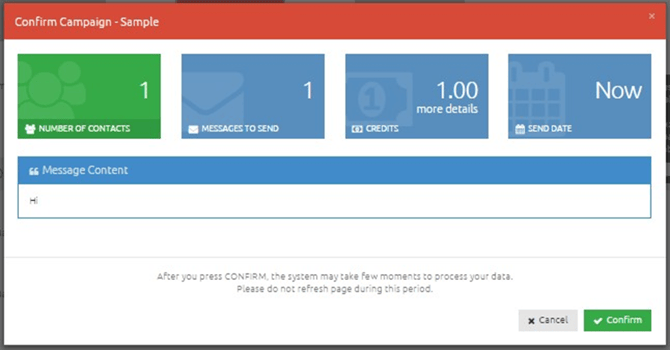
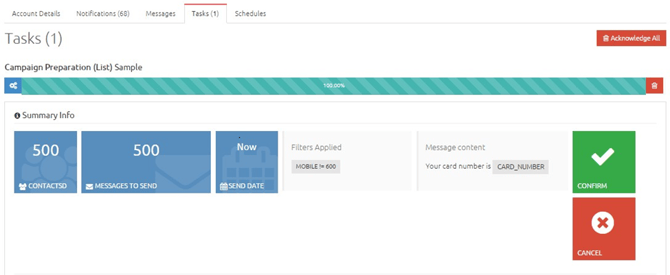
Confirm Campaign
After setting up your campaign, you will be asked to confirm the details before sending.
Small Campaigns:
- A popup box will display the number of contacts, messages to send, send date, and message content.
- If details are correct, click Confirm to proceed.
Large Campaigns:
- Large campaigns will take longer to process. You will be taken to the tasks page to view the processing status.
- Confirm the campaign once the preparation is complete.
Additional Features for Sending to a Saved List
Filters:
- Filters allow you to send campaigns to specific segments of a saved list based on criteria in your list.
- Use the "Add Filter" button to create filters based on columns in your list.
-
- Set limits on the number of SMS sent in a campaign based on criteria you set.
- Enable Advanced Options to cap the number of recipients and sort them based on specific columns and values.
Advanced Options:
By following these steps and guidelines, you can efficiently set up and send your SMS campaigns using Phonovation.